In today’s digital age, online privacy is a crucial aspect of our lives. With the increasing amount of personal data being collected and stored online, it is essential to understand the importance of protecting our individual rights to privacy.
Intro to Whonix
If you’re looking for a solution to protect your online privacy, Whonix is an excellent option. Whonix is a Linux-based distribution specifically designed with privacy and security in mind, providing its users with a robust platform for shielding their digital footprints.
One of the key features that makes Whonix an attractive option for me is its KVM images. These images enable users to create isolated virtual machines that can be easily spun up and down as needed.
In this article, I will summarize my steps to set up and run Whonix system using KVM and Virt-Manager. This covers everything from creating the KVM images and virtual networks for both the Gateway and Workstation configurations to successfully booting up your secure Whonix environment.
However, before starting, you need to install KVM and Virt-Manager first. I have uploaded a video documentation of my installation process for Virt-Manager on Arch Linux; please watch the video if needed.
Download and Configuring Whonix KVM
Download the compressed archive of Whonix KVM from its
official page and place it in the ~/Downloads directory. There are two
versions: GUI and CLI. The Whonix CLI version is designed for advanced users
who want to use Whonix without a graphical user interface (GUI). In this
article, I will be using the GUI version, which uses Xfce as its desktop
environment.
Extract the downloaded archive using the tar utility:
1cd ~/Downloads
2tar -xvf Whonix*.libvirt.xz
The extracted archive contains important documents, including the License Agreement and disclaimer, as well as XML templates and Whonix image files for both Gateway and Workstation.
You can modify the XML files and adjust the virtual machine settings before importing them. But, unless you’re familiar with libvirt’s XML structure, editing the default configuration is not recommended; instead, make modifications through Virt-Manager later if needed.
Adding Whonix Virtual Networks
To add virtual networks for your Whonix virtual machines, import both
Whonix_external_network.xml and Whonix_internal_network.xml by issuing
these commands:
1sudo virsh -c qemu:///system net-define Whonix_external*.xml
2sudo virsh -c qemu:///system net-define Whonix_internal*.xml
Open the Virt-Manager application, right-click on your KVM connection, and select “Details” from the menu. Then, go to the “Virtual Networks” tab and ensure that the “Auto Start on Boot” checkbox is checked for both Whonix Internal and Whonix External virtual networks.
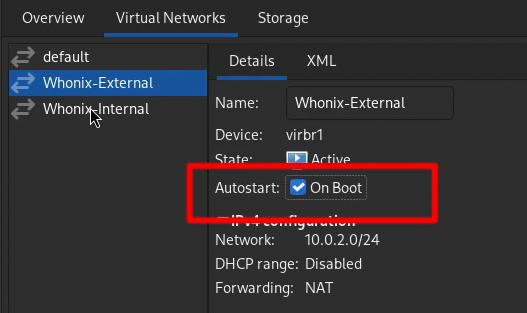
The Whonix Internal network is an isolated, virtual network shared between the Whonix-Gateway and the Whonix-Workstation. This network is entirely separate from the external network and does not directly connect to the Internet.
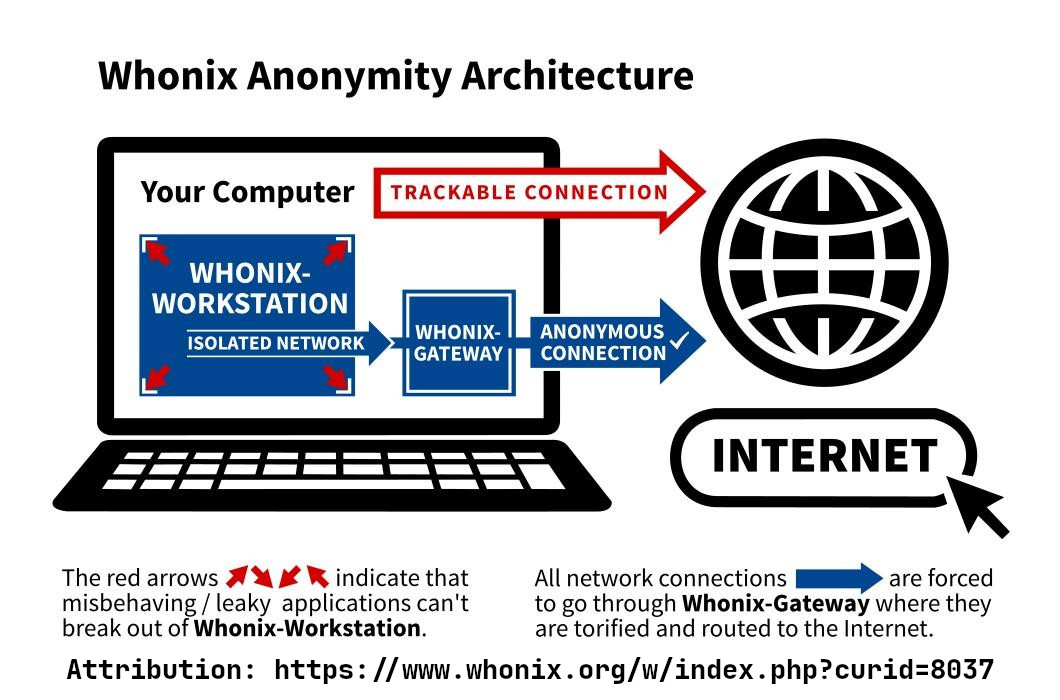
The external network used by the Whonix-Gateway to establish a connection with the Tor network via the host machine’s network interface. In summary, the Whonix-Gateway acts as the sole router for the Whonix-Workstation, ensuring that all traffic is anonymized through the Tor Network.
Whonix Image Files
The Whonix XML files are configured to use image files from the
/var/lib/libvirt/images directory, which is the default libvirt storage
location for most Linux distributions.
Go back to the terminal and move the Whonix VM image files to the
/var/lib/libvirt/images directory:
1sudo mv Whonix-Gateway*.qcow2 /var/lib/libvirt/images/Whonix-Gateway.qcow2
2sudo mv Whonix-Workstation*.qcow2 /var/lib/libvirt/images/Whonix-Workstation.qcow2
Note: Whonix disk images are sparse files, which means that you need
to use the --sparse=always flag when copying them instead of moving them. For
example:
1sudo cp --sparse=always Whonix-Gateway*.qcow2 /var/lib/libvirt/images/Whonix-Gateway.qcow2
2sudo cp --sparse=always Whonix-Workstation*.qcow2 /var/lib/libvirt/images/Whonix-Workstation.qcow2
Importing Whonix VM Templates
Import your Whonix-Gateway and Workstation virtual machines from the XML configuration file. To do this, run the following commands in the terminal:
1sudo virsh -c qemu:///system define Whonix-Gateway*.xml
2sudo virsh -c qemu:///system define Whonix-Workstation*.xml
Note that these commands will import the XML configuration files and create the corresponding virtual machines. Make sure you have the correct file names and paths to avoid errors.
Additionally, after importing the templates, you may want to verify that your virtual machines are created successfully by checking their status using the following command:
1sudo virsh list --all
This will display a list of all the virtual machines running on your system, including the Whonix-Gateway and Workstation.
Whonix-Gateway CLI mode
If your host operating system has limited RAM, you can run Whonix-Gateway in CLI mode by simply changing the memory allocation to 512MB or less. However, please be aware that resource-intensive operations, such as upgrading the operating system with a minimum amount of memory, can cause virtual machines to freeze or become unresponsive. To avoid this, make sure to allocate sufficient resources to your Whonix VMs, especially when performing any software updates or upgrades.
Apart from controlling Tor and installing updates, there is not much else to do on Whonix-Gateway. Activities such as running applications, especially the Tor Browser, should never be started on Whonix-Gateway. Instead, all user-centric applications ought to be launched from Whonix-Workstation to safely utilize the Tor network.
Using Whonix-Workstation
Since Whonix-Workstation relies on Whonix-Gateway for online functionality, you need to start the Whonix-Gateway before booting up the Whonix-Workstation. Failure to do so will result in the Whonix-Workstation being unable to connect to the Internet or access external resources.
Pre-installed Applications and Utilities
Whonix-Workstation provides bunch of utilities to maintain the VM, such as
upgrading the operating system without requiring root privileges using
upgrade-nonroot utility. It also provides stream isolation for many
pre-installed or custom-installed applications, such as Hexchat and
Thunderbird, using a dedicated Tor SocksPort to prevent identity
correlation that may otherwise occur.
My View on Privacy and Anonymity
Online privacy and anonymity have become intertwined concepts, but, they’re not exactly the same thing. In my view, online privacy refers to the ability to control who has access to our personal information, while online anonymity refers to the ability to conceal or hide our identity online.
Online anonymity can often increase online privacy in several ways:
- Masking Personal Data: By using Tor or I2P, individuals can mask their IP addresses, locations, and browsing habits.
- Reducing Surveillance: Online anonymity can reduce the amount of surveillance being conducted on individuals, as it becomes harder for governments and corporations to monitor their online interest and activities.
But I’m a little skeptical about online anonymity. I believe that with sufficient time, power, and resources, it’s possible to trace everything back to its origin. While this might sound pessimistic, it’s a harsh reality we must confront. With advancements in technology and data collection, it has become increasingly easy for governments, corporations, and hackers to track down individuals online.
Although online anonymity can increase online privacy, it’s not a foolproof solution. However, it’s always a good idea to use a combination of tools and strategies to maintain online privacy and security.

