

As a prerequisite to using this guide, and before continuing, you must make sure that you have successfully set up your own IPsec VPN server, and upgraded Libreswan to the latest version due to CVE-2019-10155. This for advanced users only. Other users please use IPsec/L2TP or IPsec/XAuth mode.
Intro
Modern operating systems support the IKEv2 standard. Internet Key Exchange (IKE or IKEv2) is the protocol used to set up a Security Association (SA) in the IPsec protocol suite. Compared to IKE version 1, IKEv2 contains improvements such as Standard Mobility support through MOBIKE and improved reliability.
Libreswan can authenticate IKEv2 clients on the basis of X.509 Machine Certificates using RSA signatures. This method does not require an IPsec PSK, username or password. It can be used with:
- OS X (macOS)
- iOS (iPhone/iPad)
- Android 4.x and newer (using the strongSwan VPN client)
- Windows 7, 8.x and 10
Because IKEv2 use key exchange, and you need to import Server and Client Certificate on your machine. It will be a problem in the future to manage/revoke the imported certificate if you have multiple IKEv2 VPN servers with same root CA Common Name and client certificate username.
This is my personal snippet to set up IKEv2 VPN server & clients for multiple servers. Basically I only add (let say) server name or node name after root CA Common Name and client certificate username.

You don’t need to follow this method if you only connect to 1 IKEv2 server, use the original guide instead.
Set up IKEv2 VPN Server
The following example shows how to configure IKEv2 with Libreswan. Any commands below must be run as root.
Find the VPN server’s public IP, save it to a variable and check.
1PUBLIC_IP=$(dig @resolver1.opendns.com -t A -4 myip.opendns.com +short)
2[ -z "$PUBLIC_IP" ] && PUBLIC_IP=$(wget -t 3 -T 15 -qO- http://ipv4.icanhazip.com)
3printf '%s\n' "$PUBLIC_IP"
Make sure the output matches the server’s public IP. The $PUBLIC_IP variable is required for the next steps.
Create new ikev2.conf file in /etc/ipsec.d/ directory and include them in /etc/ipsec.conf :
 1cat > /etc/ipsec.d/ikev2.conf <<EOF
 2
 3conn ikev2-cp
 4  left=%defaultroute
 5  leftcert=$PUBLIC_IP
 6  leftid=@$PUBLIC_IP
 7  leftsendcert=always
 8  leftsubnet=0.0.0.0/0
 9  leftrsasigkey=%cert
10  right=%any
11  rightid=%fromcert
12  rightaddresspool=192.168.43.10-192.168.43.250
13  rightca=%same
14  rightrsasigkey=%cert
15  narrowing=yes
16  dpddelay=30
17  dpdtimeout=120
18  dpdaction=clear
19  auto=add
20  ikev2=insist
21  rekey=no
22  pfs=no
23  ike-frag=yes
24  ike=aes256-sha2,aes128-sha2,aes256-sha1,aes128-sha1,aes256-sha2;modp1024,aes128-sha1;modp1024
25  phase2alg=aes_gcm-null,aes128-sha1,aes256-sha1,aes128-sha2,aes256-sha2
26EOF
1if ! grep -qs '^include /etc/ipsec\.d/\*\.conf$' /etc/ipsec.conf; then
2  echo >> /etc/ipsec.conf
3  echo 'include /etc/ipsec.d/*.conf' >> /etc/ipsec.conf
4fi
NOTICE: You should upgrade Libreswan to the latest version due to IKEv1 informational exchange packets not integrity checked (CVE-2019-10155).
We need to add a few more lines for IKEv2 connection config on /etc/ipsec.conf file related to Libreswan version. First, check your Libreswan version:
1ipsec --version
For Libreswan 3.23 and newer, add these following config under IKEv2 connection config in /etc/ipsec.conf.
1  modecfgdns="8.8.8.8 8.8.4.4"
2  encapsulation=yes
3  mobike=no
Note: If your server runs Debian or CentOS/RHEL and you wish to enable MOBIKE support, replace
mobike=nowithmobike=yesin the command above. DO NOT enable this option on Ubuntu systems.
For Libreswan 3.19-3.22:
1  modecfgdns1=8.8.8.8
2  modecfgdns2=8.8.4.4
3  encapsulation=yes
For Libreswan 3.18 and older:
1  modecfgdns1=8.8.8.8
2  modecfgdns2=8.8.4.4
3  forceencaps=yes
You can replace Google Public DNS
8.8.8.8and8.8.4.4with your server provider DNS if you want.
Generate Certificate Authority (CA) and VPN Server Certificates
- You can specify the certificate validity period (in months) with
-vargument. e.g.,-v 36. - As I mentioned above, To easily manage VPN certificates on multiple server. I’ve added
SERVERNAMEafterIKEv2 VPN CACommon Name. ReplaceSERVERNAMEwith something you can easily remember.
1certutil -z <(head -c 1024 /dev/urandom) \
2  -S -x -n "IKEv2 VPN CA SERVERNAME" \
3  -s "O=IKEv2 VPN,CN=IKEv2 VPN CA SERVERNAME" \
4  -k rsa -g 4096 -v 36 \
5  -d sql:/etc/ipsec.d -t "CT,," -2
1Generating key.  This may take a few moments...
2
3Is this a CA certificate [y/N]?
4y
5Enter the path length constraint, enter to skip [<0 for unlimited path]: >
6Is this a critical extension [y/N]?
7N
Note: If you specified the server’s DNS name (instead of its IP address) in step 1 above, you must replace --extSAN "ip:$PUBLIC_IP,dns:$PUBLIC_IP" in the command below with --extSAN "dns:$PUBLIC_IP".
1certutil -z <(head -c 1024 /dev/urandom) \
2  -S -c "IKEv2 VPN CA SERVERNAME" -n "$PUBLIC_IP" \
3  -s "O=IKEv2 VPN,CN=$PUBLIC_IP" \
4  -k rsa -g 4096 -v 36 \
5  -d sql:/etc/ipsec.d -t ",," \
6  --keyUsage digitalSignature,keyEncipherment \
7  --extKeyUsage serverAuth \
8  --extSAN "ip:$PUBLIC_IP,dns:$PUBLIC_IP"
Generate Client Certificates
The next step is to generate client certificate(s), then export the .p12 file that contains the client certificate, private key, and CA certificate.
Run these command to generate client certificate:
Note: Replace
VPNUSERNAMEwith your username. I recommend you to add prefix or suffix related with your server name.
1certutil -z <(head -c 1024 /dev/urandom) \
2  -S -c "IKEv2 VPN CA SERVERNAME" -n "VPNUSERNAME" \
3  -s "O=IKEv2 VPN,CN=VPNUSERNAME" \
4  -k rsa -g 4096 -v 36 \
5  -d sql:/etc/ipsec.d -t ",," \
6  --keyUsage digitalSignature,keyEncipherment \
7  --extKeyUsage serverAuth,clientAuth -8 "VPNUSERNAME"
Then export client certificate with to pk12util command below:
1pk12util -o VPNUSERNAME.p12 -n "VPNUSERNAME" -d sql:/etc/ipsec.d
1Enter password for PKCS12 file:
2Re-enter password:
3pk12util: PKCS12 EXPORT SUCCESSFUL
YOU MUST enter a secure password to protect the exported
.p12file because when importing into an iOS or macOS device, this password cannot be empty.
You may repeat this step to generate certificates for additional VPN clients, but make sure to replace every VPNUSERNAME with VPNUSERNAME2, etc.
Note: To connect multiple VPN clients simultaneously, you must generate a unique certificate for each device.
(For macOS and iOS clients) Export the CA certificate as vpnca_SERVERNAME.cer:
1certutil -L -d sql:/etc/ipsec.d -n "IKEv2 VPN CA SERVERNAME" -a -o vpnca_SERVERNAME.cer
To check certificate database, you can run these following commands:
1certutil -L -d sql:/etc/ipsec.d
1Certificate Nickname                               Trust Attributes
2                                                   SSL,S/MIME,JAR/XPI
3
4IKEv2 VPN CA SERVERNAME                            CTu,u,u
5($PUBLIC_IP)                                       u,u,u
6VPNUSERNAME                                        u,u,u
To display a certificate, use:
1certutil -L -d sql:/etc/ipsec.d -n "VPNUSERNAME"
To delete a certificate, use:
1certutil -D -d sql:/etc/ipsec.d -n "VPNUSERNAME"
For other certutil usage, read this page.
The last step on the server is restart ipsec service (this is important).
1service ipsec restart
The IKEv2 setup on the VPN server is now complete. Follow instructions below to configure VPN clients.
Configure IKEv2 VPN Clients
Note: If you specified the server’s DNS name (instead of its IP address) for $PUBLIC_IP variable in first step above, you must enter the DNS name in the Server and Remote ID fields.
macOS Clients Configuration
Transfer both vpnca_SERVERNAME.cer and VPNUSERNAME.p12 to your Mac, then double-click to import them one by one into the login keychain in Keychain Access.
Next, double-click on the imported IKEv2 VPN CA SERVERNAME certificate, expand Trust and select Always Trust from the IP Security (IPsec) drop-down menu.

When finished, check to make sure both VPNUSERNAME and IKEv2 VPN CA SERVERNAME are listed under the Certificates category of login keychain.
- Go to Network section in System Preferences.
- Click the + button in the bottom-left corner of the window.
- Select VPN from the Interface drop-down menu.
- Select IKEv2 from the VPN Type drop-down menu.
- Service Name: enter anything you like (usually name of the VPN connection).
- Click Create.
- Server Address: Your VPN
Server IP(or DNS name). - Remote ID: Your VPN
Server IP(or DNS name). - Leave the Local ID field blank.
- Click the Authentication Settings… button.
- Select None from the Authentication Settings drop-down menu.
- Select the Certificate radio button, then select the VPNUSERNAME certificate.
- Click OK.
- Check the Show VPN status in menu bar checkbox.
- Click Apply to save the VPN connection information.
- Click Connect.
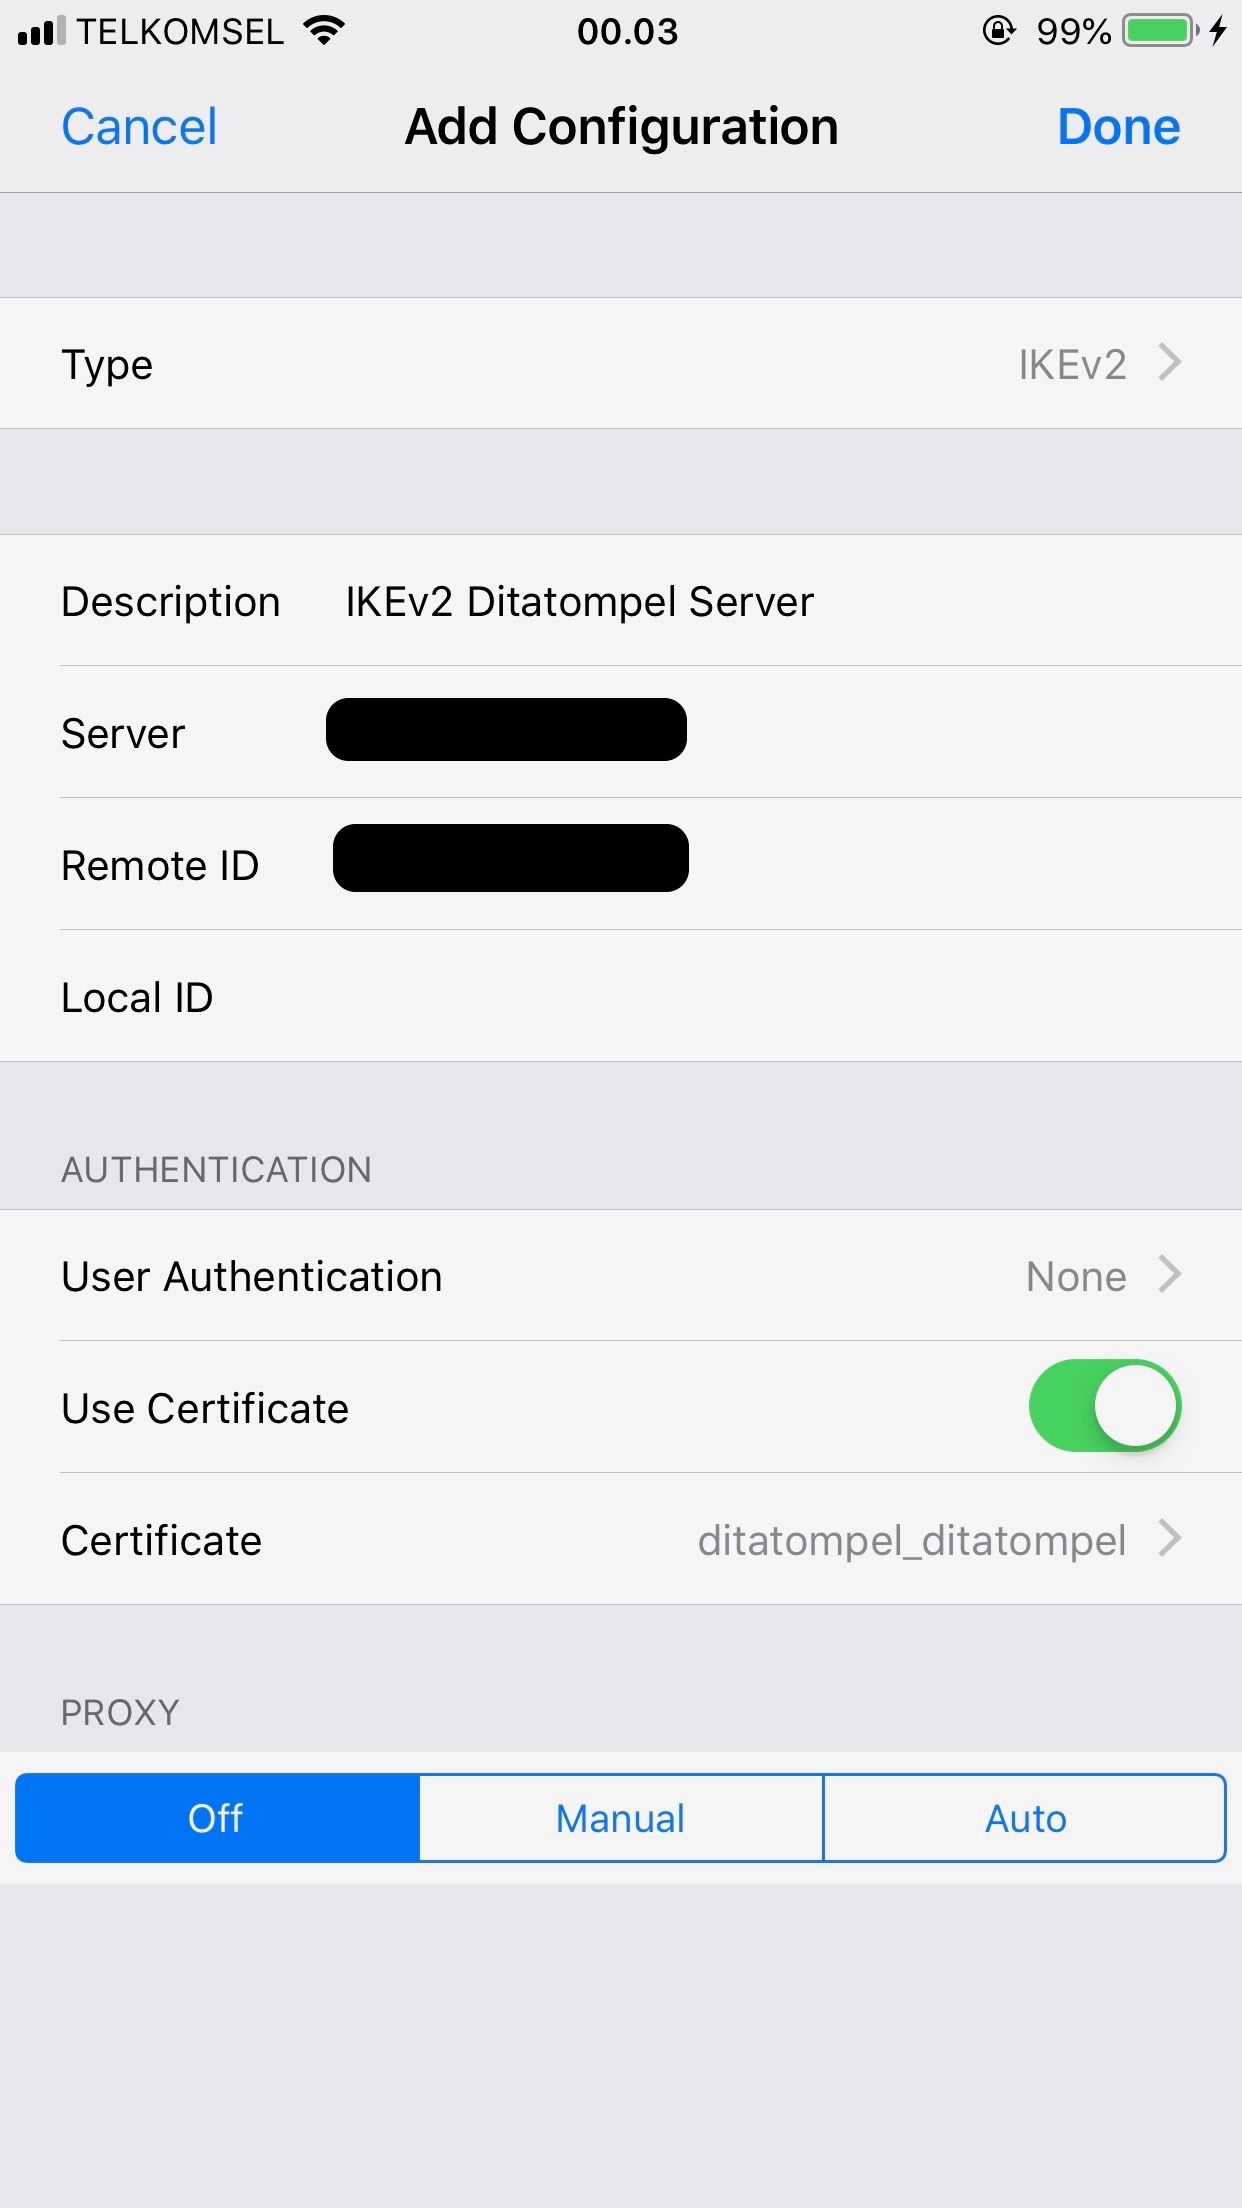
iOS (iPhone/iPad) Clients Configuration
Transfer both vpnca_SERVERNAME.cer and VPNUSERNAME.p12 to your iOS device, then import them one by one as iOS profiles. To transfer the files, you may use AirDrop or host the files on your website, then download and import them in Safari. When finished, check to make sure both VPNUSERNAME and IKEv2 VPN CA SERVERNAME are listed under Settings → General →Profiles.
- Go to Settings → General → VPN.
- Tap Add VPN Configuration….
- Tap Type. Select IKEv2 and go back.
- Description: enter anything you like (usually name of the VPN connection).
- Server: Your VPN
Server IP. - Remote ID: Your VPN
Server IP(or DNS name). - Leave the Local ID field blank.
- Tap User Authentication. Select None and go back.
- Make sure the Use Certificate switch is ON.
- Tap Certificate. Select VPNUSERNAME and go back.
- Tap Done.
- Slide the VPN switch ON.

Once connected, you will see a VPN icon in the status bar. You can verify that your traffic is being routed properly by looking up your IP address on DuckDuckGo.
Other Devices
Since I only use IKEv2 on my Mac and iPhone for work device, I can’t post guide for Windows, Linux, and Android here. You can follow the guide for each OS here.
Known issues
- The built-in VPN client on Windows may not support IKEv2 fragmentation. On some networks, this can cause the connection to fail or have other issues. You may instead try the IPsec/L2TP or IPsec/XAuth mode.
- If using the strongSwan Android VPN client, you must upgrade Libreswan on your server to version
3.26or above. - If your VPN client can connect but cannot open any website, try editing
/etc/ipsec.confon the VPN server. Find the linephase2alg=under sectionconn ikev2-cpand deleteaes_gcm-null,. Save the file and runservice ipsec restart. - Ubuntu 18.04 and CentOS users may encounter the error “The password you entered is incorrect” when trying to import the generated
.p12file into Windows. This is due to a bug inNSS. Read more here. - Connecting multiple IKEv2 clients simultaneously from behind the same NAT (e.g., home router) is not supported at this time. For this use case, please instead use IPsec/XAuth mode.
Credits
- All articles credits belongs to Lin Song and contributors.
- Feature Image credit to portal gda Flickr.
Links and Resources
- https://github.com/hwdsl2/setup-ipsec-vpn
- https://github.com/hwdsl2/setup-ipsec-vpn/blob/master/docs/ikev2-howto.md
- https://github.com/hwdsl2/setup-ipsec-vpn/blob/master/docs/clients.md#troubleshooting
- https://libreswan.org/wiki/VPN_server_for_remote_clients_using_IKEv2
- https://libreswan.org/wiki/HOWTO:_Using_NSS_with_libreswan
- https://libreswan.org/man/ipsec.conf.5.html
- https://wiki.strongswan.org/projects/strongswan/wiki/WindowsClients
- https://wiki.strongswan.org/projects/strongswan/wiki/AndroidVpnClient


