How to enable TPM on KVM host and enable Secure-Boot for Windows 11 VM.
On this page
Microsoft tightened the security of Windows 11 by adding TPM
and Secure-Boot as the minimum requirement to install it.
This article show how to enable TPM on KVM host and
enable Secure-Boot for Windows 11 VM.
Before starting and going any further, you need to fulfill the following
requirements to follow this article:
Configured and
running KVM environment
including virt-manager (Virtual Machine Manager GUI) on your host
machine.
My KVM host running on Arch (BTW); however, the steps mentioned here are
identical for other Linux distributions as well.
Install TPM on Linux KVM Host
To emulate TPM, we need to install a software called swtpm,
a Libtpms-based TPM emulator with socket, character device, and Linux CUSE
interface.
Since swtpm already available from Arch Community package repository, we
can simply install it using pacman -S swtpm. If you are using another
distro, look for information on how to install swtpm on your favorite
distro’s documentation page.
For example, if you running KVM Host on Ubuntu, you need to add
Stefan Berger’s PPA repository to your machine before doing
apt install swtpm-tools.
To check your installed swtpm version, simply run swtpm --version command:
1TPM emulator version 0.7.3, Copyright (c) 2014-2021 IBM Corp
Create Windows 11 VM
Create a new VM for Windows 11 from virt-manager, attach
Windows 11 ISO image to your Windows 11 VM, configure your desired CPU,
RAM and storage capacity for your Windows 11 VM, and at the end of the wizard,
tick “Costumize configuration before install” checkbox.
Configure Windows 11 VM Hardware
In order for Windows 11 work smoothly on KVM, we need to make some changes on
its virtual hardware.
Click the Overview section, change firmware to something similar to
UEFI x86_64: /usr/share/edk2-ovmf/x64/OVMF_CODE.secboot.fd.
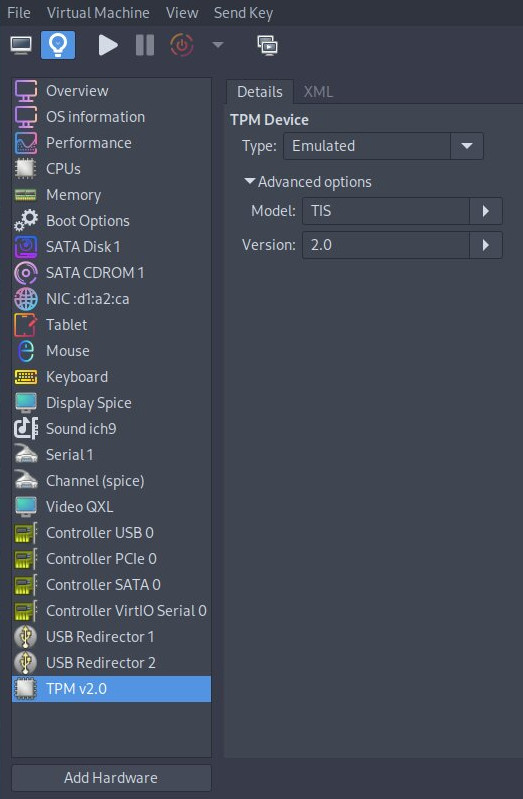
Click Add Hardware and add TPM. Keep the Type option as Emulated,
change Model option from CRB to TIS, and Version option to 2.0.
Click Network interface section and change Device model from
e1000e to virtio.
Note: If you allocate more than one virtual CPU (vCPU), make sure the CPU
topology you configure uses 1 socket. This is because Windows Home Edition
only reads a maximum of 1 CPU socket, while Windows Pro Edition reads
a maximum of 2 CPU sockets. For more detailed information, see the
Windows edition comparison chart.
So play on CPU cores and threads, because the average consumer hardware only
has 1 CPU socket (unless you are using a mid-range / high-end server).
Install Windows 11
Boot up the VM and follow Windows 11 installation wizard and
initial setup wizard. During the initial setup wizard, you’ll notice you
can’t connect to the network because Windows didn’t detect any network
interface. For now, we can skip the problem for now, and fix the network
issue latter.
Click “I don’t have internet” and “Continue with limited setup”.
Note: In the latest version of Windows (the last one I tried in the
Win11_23H2_English_x64v2.iso), the “I don’t have internet” button does
not appear.BypassNRO.cmdTo display it, press SHIFT + F10 type
OOBE\BypassNRO.cmd then press ENTER. After that the computer
will restart and the “I don’t have internet” button will appear.
Continue initial setup wizard by create a local account, set
3 security questions and “privacy” settings stuff. Wait for a few
minutes until you boot into Windows desktop successfully.
Until this step, your Windows 11 VM is successfully installed. Now, you need
to poweroff the VM to fix network driver problem.
Install virtio driver on Windows 11 VM
Go to SATA CDROM 1 section, and change Source path from where your
Windows 11 VM ISO is located to where Windows 11 virtio drivers by simply
click Browse button and choose
downloaded Windows 11 virtio drivers on your local machine.
Now, boot up the Windows 11 VM again. After logged in to desktop, click
Search Icon from task bar, search for “Device Manager” and run
“Device Manager” program.
On “Device Manager” program, right click Ethernet adapter and choose to
update driver. Choose “Browse my computer for drivers” => pick the
Windows 11 virtio drivers ISO from CDROM, tick “Include subfolders”
checkbox, click the “Next” button and you should see the ethernet adapter
driver is successfully installed.