

Recently, several friends have asked and are interested in learning to build servers. Most of them think that to learn to build or maintain a server, you need a Virtual Private Server (VPS) or even a dedicated server. Is that true? Although the price for VPS for some students is considered quite high, let alone a dedicated server.
Actually, if we just want to learn, we don’t have to rent a VPS; instead, we can use something called virtualization (It’s called learning, so you don’t need a public IP that can be accessed by anyone; that’s why we use a local network).
There are many ways to do this virtualization: OpenVZ, VirtualBox, Xen, VMware, etc. - from para-virtualization to full-virtualization, from community (free) to enterprise (paid) versions. Each has its advantages and disadvantages (although I don’t want to debate this issue).
This time, I used VirtualBox because many users already use it on their personal computers. Before continuing, I will first inform you of the situation and conditions at the time this guide was created.
- Subnet:
/24 - Gateway:
192.168.0.2 - Host OS: IP=
192.168.0.242, OS=Linux
I want to create two virtual servers - one for a database server (MySQL server) and another server for something I haven’t thought of yet. ;p
So what’s needed:
- VirtualBox with
vboxnetfitmodule - ISO CentOS 6.x netinstall
- Internet connection
Video:
Part 1: Setting Guest Hosts (virtual servers)
Firstly, we definitely need VirtualBox. Please download it if you don’t have it already. Then, install the vboxnetfit module for bridged adapter to virtual server. You may also need the vboxdrv module (optional for running a custom kernel). Activate it by issuing modprobe [module_name] command.
Next, let’s run VirtualBox and create a virtual host. To do this, click the New icon at the top left, then enter the name and OS information used. For example:
- Name : CentOS Server Example III
- Type : Linux
- Version : RedHat (32/64 according to Host CPU)
Then press the Next button.

Next, determine the RAM capacity that will be used by the virtual server, just give it 512MB, then press the next button again.

Next, create a virtual HDD, select option 2 “Create a virtual hard drive now” then press next.

After that, another option appears for the hard drive type. If you don’t want to move to another virtualization later, just select default VDI. But this time I chose QEMU.

Later on the left there will be a list of Virtual Guests that have been created. Right click on the menu we just created and select “Settings”.
In the Storage => Controller IDE menu, select the image file used. I’m using ISO CentOS 6.2 Netinstall 64-bit.

Then in the Network menu -> Adapter 1, change Attached to from NAT to Bridged Adapter. The name corresponds to the interface being used (in my case: eth0).

Click Ok, then Start Virtual Guest.
So, the installation process is the same as installing a regular OS.

What you need to pay attention to is: Use a static IP/Static DHCP address from the router, not dynamic. Because if our IP is dynamic it will be difficult to remote, especially the SSH fingerprint problem.

This time I gave the IP 192.168.0.152, Gateway 192.168.0.2 and use Google’s DNS server (8.8.8.8).
Then fill in the CentOS image URL, I used mirror.nus.edu.sg, please change it via kambing.ui.ac.id / whatever that is. What is clear is that it suits the architecture you are using. For example (http://kambing.ui.ac.id/centos/6.3/os/x86_64 for those using 64-bit).

Then click ok and wait for the installation process finished; then you will be asked to reboot the OS.
Reboot/Poweroff the virtual guest. We edit the primary boot from CD-ROM to Hard Disk. The method:
Setting -> System -> Motherboard -> Boot Order -> Raise the Hard Disk menu to the first position / uncheck Floppy and CD/DVD-ROM.

Try running Virtual Guest again. You can use CLI so that the virtual host can run in the background:
- display the Virtual Guest list with the command:
VBoxManage list vms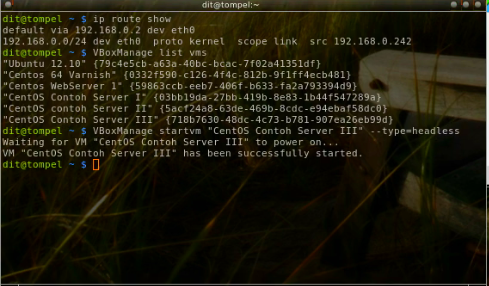
- run the following command to run the virtual guest in the background:
VBoxManage startvm "virtual machine name" --type=headless.

For example:
1VBoxManage startvm "CentOS Server Example III" --type=headless
Once it’s running, try ping the virtual guest IP that we created earlier (192.168.0.152), wait for it to come up and log in via SSH.
1ssh [email protected]
From there you can set the hostname, update software, etc.
Part 2: Install another Guest Host
Repeat Part 1 to create another Virtual Guest so that we have two virtual hosts, and run it simultaneously with the headless option. Give this second virtual guest the IP 192.168.0.151. For example, this time, we will use the second virtual guest as a database server.
In this second virtual guest, install MySQL server:
1yum install mysql mysql-devel mysql-server
Start MySQL server
1service mysqld start
Setup the MySQL server by running the command /usr/bin/mysql_secure_installation. This will prompt an interactive sequence of questions to secure the MySQL server installation.
Then, log in to the MySQL server as the root user to create a new user and database.
1mysql -h localhost -u root -p
You will be asked to enter the MySQL password for the root user. Once logged in, create a new user:
1CREATE USER 'ditatompel'@'192.168.0.%' IDENTIFIED BY 'password';
Where:
ditatompelis username192.168.0.%represents the hostname/IP from which it makes remote connections to the MySQL server (note: this is equivalent to192.168.0.0/24)passwordis the password used
1CREATE DATABASE IF NOT EXISTS db_testing;
Where db_testing is the name of the database that we will use later.
1GRANT SELECT, INSERT, UPDATE, DELETE ON db_testing.* TO 'ditatompel'@'192.168.0.%';
Where SELECT, INSERT, UPDATE, and DELETE are user permissions granted from host 192.168.0.% on all tables in the db_testing database (db_testing.*). Don’t forget to execute FLUSH PRIVILEGES afterwards.
1FLUSH PRIVILEGES;
Also ensure that the default MySQL port (3306) is not blocked by your firewall.

Afterward, try connecting to the MySQL server from the first virtual guest or from our PC using the following command:
1mysql -h 192.168.0.151 -u ditatompel -p
Where 192.168.0.151 is the IP address of the MySQL server and ditatompel is the user that we created on the MySQL server previously.

Q: If I want to create 5 virtual guests and my laptop/PC RAM is only 1GB, that’s not possible, then what?
A: Then use/bring a friend’s laptop home, plug it into the same network, and run VirtualBox on that machine. Do the steps above to set up the virtual environment. If you have multiple laptops and can dedicate one laptop per three virtual guests, you could potentially create 12 virtual guests.
So, once everything is connected and communicating, that’s essentially it. You can also conduct testing to learn about port knocking, firewall configuration, intrusion detection systems (IDS)/intrusion prevention systems (IPS), load balancing, and clustering. However, the results will still be far from optimal.


