This article may be useful for those of you who want to get started using Git and connecting to GitHub using the SSH protocol. The process starts from creating an SSH key pair to adding the SSH public key to your GitHub account.
Git is one of the most popular and widely used version controls by software developers around the world. Several “Cloud” based version controls service build on top of Git such as GitLab, GitHub, and Codeberg offer several unique features from each other. However, there is a feature that every provider definitely has, the feature is accessing and Git repositories using the SSH protocol.
The authentication process using the SSH protocol utilizes SSH public and private keys, so you don’t need to provide a username or personal access token every time you want to access or commit to your repository.
In this article, I want to share how to use the SSH protocol as an authentication method for a specific provider: GitHub. But before starting, make sure git and ssh are installed on your computer and of course you must have an account at GitHub.com.
Global config
Note: If you have already setting up your Git global config, you can skip this step.
Run the following command to set your name and email when committing to Git repository:
1git config --global user.name "John Doe"
2git config --global user.email [email protected]
Change John Doe and [email protected] with your name and email address.
Note: Make sure the email address matches with the email address you use at GitHub.com.
Creating SSH key
When you want to access your private repository or make changes to your GitHub repository using SSH, you need to use an SSH private key for the authentication process. Therefore, create an SSH key pair using the following command:
1mkdir ~/.ssh && chmod 700 ~/.ssh
2ssh-keygen -t ed25519 -f ~/.ssh/github_key -C "SSH key untuk github"
The command above will create a .ssh folder under your $HOME directory, change the directory permission, and put the generated private key in $HOME/.ssh/github_key and the public key in $HOME/.ssh/github_key.pub. Example of output from the ssh-keygen command above:
 1Generating public/private ed25519 key pair.
 2Enter passphrase (empty for no passphrase):
 3Enter same passphrase again:
 4Your identification has been saved in /home/jasmerah1966/.ssh/github_key
 5Your public key has been saved in /home/jasmerah1966/.ssh/github_key.pub
 6The key fingerprint is:
 7SHA256:dPniZJhVTjmj2gOi5Q4we8gucBs6b+4fpPJ6J2xnj7Q SSH key untuk github
 8The key's randomart image is:
 9+--[ED25519 256]--+
10|            o.   |
11|           =+    |
12|        . +..o   |
13|  o   o..=..     |
14| . =.+ .S++ .    |
15|. *o+ . .+o.     |
16|o=.+oo    ..     |
17|+oO.++.          |
18|.@=*E..          |
19+----[SHA256]-----+
Note: You will be asked to enter a
passphraseduring the SSH key pair generation process above. It’s up to you whether you want to fill or leave your SSH key passphrase empty. If you fill in a passphrase, you will be asked to provide the passphrase when you use the SSH key.
Using SSH config file
Many tutorials out there use ssh-agent as their SSH key manager. However, I prefer the trick used by @ditatompel by taking advantage of using the SSH Config File feature.
Add (or create if the file doesn’t already exist) the following lines to the SSH config file in ~/.ssh/config:
1# ~/.ssh/config file
2# ...
3
4Host github.com
5    User git
6    PubkeyAuthentication yes
7    IdentityFile ~/.ssh/github_key
8
9# ...
Make sure the IdentityFile refers to the SSH private key that you created before (example if you follow this article it is ~/.ssh/github_key).
Adding your SSH public key to your GitHub account
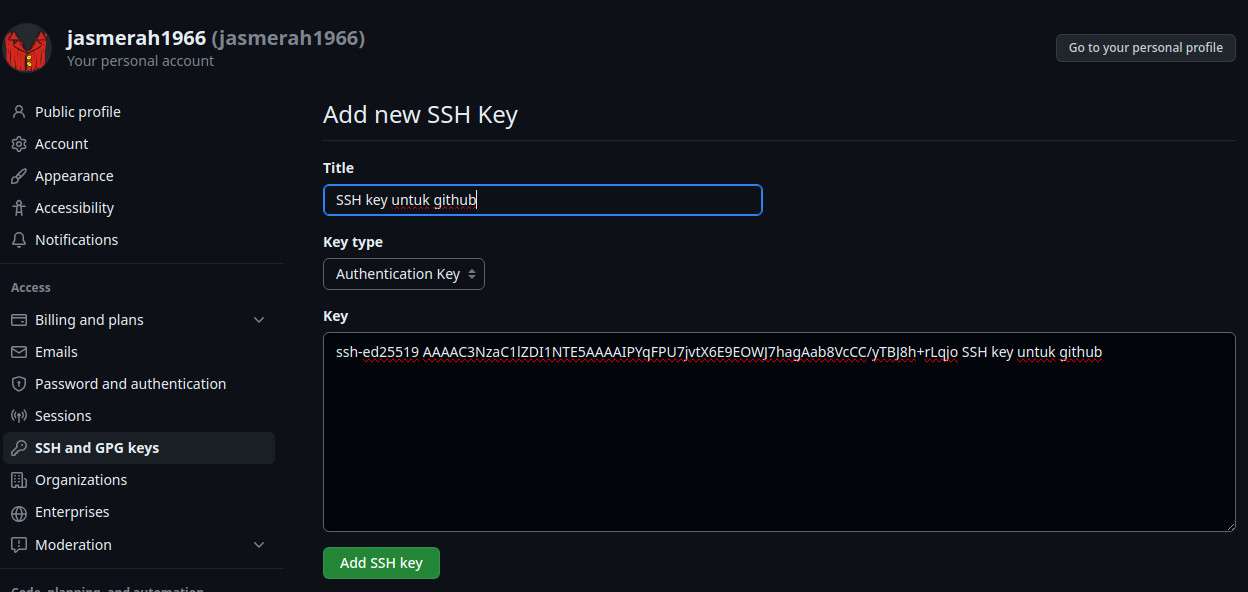
Once you have your SSH key pair and SSH config file configured, it’s time to add your SSH public key to your GitHub account.
- Go to “Settings” > “SSH and GPG keys” > click on “New SSH key” button.
- Fill “Title” with anything that you can easily remember to identify your SSH key.
- On “Key type” options, choose “Authentication Key”.
- Finally, go back to your terminal and paste content of your SSH public key (in this tutorial is
~/.ssh/github_key.pub) to “Key” textarea. Then submit by pressing “Add SSH key” button.

The configuration process is complete, and you can try connecting to GitHub with ssh -T github.com command from your terminal. You should receive a message that your connection to GitHub was successful: “Hi jasmerah1966! You’ve successfully authenticated, but GitHub does not provide shell access.”.
Next: Read How To Create Verified Sign Git Commit Using SSH or GPG Signature.


