Nginx, a web server developed by Igor Sysoev in 2002, is a new alternative to Apache.
NOTE: This article was written in 2011, so you need to adapt in following this tutorial. Moreover, currently the majority of Linux distributions switched from
sysVinittoSystemD.
Nginx (pronounced “Engine X”) is a lightweight web server and reverse proxy and email proxy with high performance, running on Windows, UNIX, GNU/Linux, Solaris, and BSD variants such as macOS.
Why Nginx?
Speed: One core processor can efficiently handle thousands of connections, resulting in significantly reduced CPU load and memory consumption.
Easy to use: Configuration files are much easier to understand and modify than other web server configurations such as Apache. Just a few lines are enough to create a fairly complete
virtual host.Plug-in system (here referred to as “
modules”)and most importantly, Open Source (BSD-like license)
Some examples of large websites that use Nginx either as a web server or as a reverse proxy to Apache include: kaskus.us, indowebster.com, wordpress.com, sourceforge. net, github.com, etc.
Why compile?
In the web server installation process, several tools and parameters are required that we have to decide on during compilation, and several additional configurations that must be carried out and adapted to our system.
Well, this time we choose to download the source code of the application and install it manually rather than installing using the package manager. There are several reasons why people choose to install manually:
- To get to know more about how the system (especially the web server) that we use works.
- (Probably) not yet available in the repositories of the Linux distribution being used.
Besides that, repositories rarely offer to download and install Nginx using the package manager (yum, apt, or yast) for the latest version (except on rolling-release distributions such as Arch Linux). Most provide old versions that are not up to date.
Nginx Compilation Process
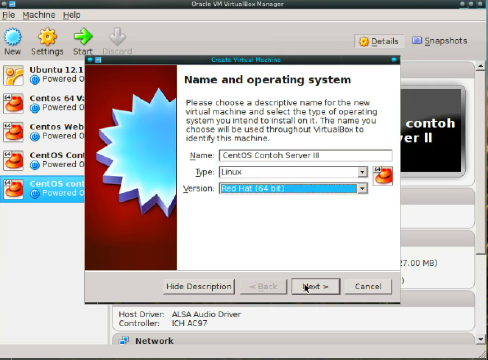
Below is a capture screen video that I made previously. Perhaps it can help in the installation process. (It doesn’t need to be exactly the same; the important thing is to know the process and how it works.)
Download source code
First, let’s download our web server from http://nginx.org/download/nginx-1.0.5.tar.gz (when I wrote this article, the latest stable version was 1.0.5).
1wget http://nginx.org/download/nginx-1.0.5.tar.gz
After that, copy the source to /usr/local/src/ and extract it.
1sudo cp nginx-1.0.5.tar.gz /usr/local/src/
2cd /usr/local/src/
3sudo tar -xvzf nginx-1.0.5.tar.gz
Notes:
- Before the installation process, it’s better to check whether port 80 is being used or not. I’m using the BackTrack distro and by default Apache uses port 80 at startup. Run
/etc/init.d/apache2 stoporkillall apache2. - Nginx is a program created using the C programming language, so to be able to compile it, we first need to have tools such as the GNU Compiler Collection (GCC) on our computer. GCC is usually installed on most Linux distros.
To confirm, just run the command gcc (without quotes) in the terminal. If you get output “gcc: no input files”, it means GCC is already installed on your computer. If not, you need to install it first.
OK, let’s continue…
./configure dan make install
Go to the nginx-1.0.5 directory under /usr/local/src/ directory and start compiling.
1cd nginx-1.0.5
2./configure
By default, the HTTP rewrite module is automatically installed during the default Nginx installation. This module requires the PCRE (Perl Compatible Regular Expression) library because the Rewrite and HTTP Core modules of Nginx use PCRE as their regular expression syntax.
Now it depends on our choice; if we:
- require a rewrite module, we have to install PCRE first:
1apt-get install libpcre3 libpcre3-dev
- If we don’t need it:
1./configure --without-http_rewrite_module
Our choice fell on the first option because most of the sites we use needs the rewrite module. So after installing PCRE, we have to configure it again.
1./configure
carry out the installation process:
1make && make install
The default installation process that we did above will place the Nginx “workspace” in the /usr/local/nginx directory
Creating a SysVinit Script for Nginx
Create a file with the name nginx in the /etc/init.d/ directory:
1nano /etc/init.d/nginx
Then copy and paste the shell script below, then save.
 1#! /bin/sh
 2### BEGIN INIT INFO
 3# Provides:          nginx
 4# Required-Start:    $all
 5# Required-Stop:     $all
 6# Default-Start:     2 3 4 5
 7# Default-Stop:      0 1 6
 8# Short-Description: starts the nginx web server
 9# Description:       starts nginx using start-stop-daemon
10### END INIT INFO
11
12PATH=/usr/local/sbin:/usr/local/bin:/sbin:/bin:/usr/sbin:/usr/bin
13DAEMON=/usr/local/nginx/sbin/nginx
14NAME=nginx
15DESC="nginx daemon"
16
17test -x $DAEMON || exit 0
18
19# Include nginx defaults if available
20if [ -f /etc/default/nginx ] ; then
21    . /etc/default/nginx
22fi
23
24set -e
25
26case "$1" in
27    start)
28        echo -n "Starting $DESC: "
29        start-stop-daemon --start --quiet --pidfile /usr/local/nginx/logs/nginx.pid \
30            --exec $DAEMON -- $DAEMON_OPTS
31        echo "$NAME."
32        ;;
33    stop)
34        echo -n "Stopping $DESC: "
35        start-stop-daemon --stop --quiet --pidfile /usr/local/nginx/logs/nginx.pid \
36            --exec $DAEMON
37        echo "$NAME."
38        ;;
39    restart|force-reload)
40        echo -n "Restarting $DESC: "
41        start-stop-daemon --stop --quiet --pidfile \
42            /usr/local/nginx/logs/nginx.pid --exec $DAEMON
43        sleep 1
44        start-stop-daemon --start --quiet --pidfile \
45            /usr/local/nginx/logs/nginx.pid --exec $DAEMON -- $DAEMON_OPTS
46        echo "$NAME."
47        ;;
48    reload)
49        echo -n "Reloading $DESC configuration: "
50        start-stop-daemon --stop --signal HUP --quiet --pidfile /usr/local/nginx/logs/nginx.pid \
51            --exec $DAEMON
52        echo "$NAME."
53        ;;
54    *)
55    N=/etc/init.d/$NAME
56    echo "Usage: $N {start|stop|restart|force-reload}" >&2
57    exit 1
58    ;;
59esac
60exit 0
chmod +x so that the script can be executed.
1chmod +x /etc/init.d/nginx
After this, we can start, stop, restart, or reload the Nginx process via the script. Let’s try running Nginx:
1/etc/init.d/nginx start
Then, we should get a welcome message “Welcome to nginx!” when accessing localhost from your browser.
Installation and configuration of PHP FastCGI (spawn-fcgi) with Nginx
Install spawn-fcgi.
1apt-get install php5-cgi spawn-fcgi
After the installation process via the package manager is complete, create a file named php-fastcgi in the /etc/init.d/ directory:
1nano /etc/init.d/php-fastcgi
Copy and paste the shell init script below:
 1#!/bin/bash
 2BIND=127.0.0.1:9000
 3USER=www-data
 4PHP_FCGI_CHILDREN=15
 5PHP_FCGI_MAX_REQUESTS=1000
 6
 7PHP_CGI=/usr/bin/php-cgi
 8PHP_CGI_NAME=`basename $PHP_CGI`
 9PHP_CGI_ARGS="- USER=$USER PATH=/usr/bin PHP_FCGI_CHILDREN=$PHP_FCGI_CHILDREN PHP_FCGI_MAX_REQUESTS=$PHP_FCGI_MAX_REQUESTS $PHP_CGI -b $BIND"
10RETVAL=0
11
12start() {
13    echo -n "Starting PHP FastCGI: "
14    start-stop-daemon --quiet --start --background --chuid "$USER" --exec /usr/bin/env -- $PHP_CGI_ARGS
15    RETVAL=$?
16    echo "$PHP_CGI_NAME."
17}
18stop() {
19    echo -n "Stopping PHP FastCGI: "
20    killall -q -w -u $USER $PHP_CGI
21    RETVAL=$?
22    echo "$PHP_CGI_NAME."
23}
24
25case "$1" in
26    start)
27        start
28        ;;
29    stop)
30        stop
31        ;;
32    restart)
33        stop
34        start
35        ;;
36    *)
37    echo "Usage: php-fastcgi {start|stop|restart}"
38    exit 1
39    ;;
40esac
41exit $RETVAL
Don’t forget to chmod +x so that the script can be executed.
1chmod +x /etc/init.d/php-fastcgi
Then, before running php-fastcgi, we first build the website structure that we will use. (I chose the /var/www/nginx directory.)
1mkdir -p /var/www/nginx; cd nginx
Create a file with the name info.php containing phpinfo(); (just to test whether PHP is running or not):
1echo "<?php phpinfo(); ?>" > info.php
Then, edit the Nginx configuration to suit the structure of the website we are building.
1nano /usr/local/nginx/conf/nginx.conf
Because our root public HTML is in /var/www/nginx, then the configuration is as follows:
  1#user  nobody;
  2worker_processes  1;
  3
  4#error_log  logs/error.log;
  5#error_log  logs/error.log  notice;
  6#error_log  logs/error.log  info;
  7
  8#pid        logs/nginx.pid;
  9
 10
 11events {
 12    worker_connections  1024;
 13}
 14
 15
 16http {
 17    include       mime.types;
 18    default_type  application/octet-stream;
 19
 20    #log_format  main  '$remote_addr - $remote_user [$time_local] "$request" '
 21    #                  '$status $body_bytes_sent "$http_referer" '
 22    #                  '"$http_user_agent" "$http_x_forwarded_for"';
 23
 24    #access_log  logs/access.log  main;
 25
 26    sendfile        on;
 27    #tcp_nopush     on;
 28
 29    #keepalive_timeout  0;
 30    keepalive_timeout  65;
 31
 32    #gzip  on;
 33
 34    server {
 35        listen       80;
 36        server_name  localhost;
 37
 38        #charset koi8-r;
 39
 40        #access_log  logs/host.access.log  main;
 41
 42        location / {
 43            root   /var/www/nginx;
 44            index  index.html index.htm;
 45        }
 46
 47        #error_page  404              /404.html;
 48
 49        # redirect server error pages to the static page /50x.html
 50        #
 51        error_page   500 502 503 504  /50x.html;
 52        location = /50x.html {
 53            root   html;
 54        }
 55
 56        # proxy the PHP scripts to Apache listening on 127.0.0.1:80
 57        #
 58        #location ~ \.php$ {
 59        #    proxy_pass   http://127.0.0.1;
 60        #}
 61
 62        # pass the PHP scripts to FastCGI server listening on 127.0.0.1:9000
 63        #
 64        location ~ \.php$ {
 65            root           html;
 66            fastcgi_pass   127.0.0.1:9000;
 67            fastcgi_index  index.php;
 68            fastcgi_param  SCRIPT_FILENAME  /var/www/nginx$fastcgi_script_name;
 69            fastcgi_param  PATH_INFO  $fastcgi_script_name;
 70            include        fastcgi_params;
 71        }
 72
 73        # deny access to .htaccess files, if Apache's document root
 74        # concurs with nginx's one
 75        #
 76        #location ~ /\.ht {
 77        #    deny  all;
 78        #}
 79    }
 80
 81
 82    # another virtual host using mix of IP-, name-, and port-based configuration
 83    #
 84    #server {
 85    #    listen       8000;
 86    #    listen       somename:8080;
 87    #    server_name  somename  alias  another.alias;
 88
 89    #    location / {
 90    #        root   html;
 91    #        index  index.html index.htm;
 92    #    }
 93    #}
 94
 95
 96    # HTTPS server
 97    #
 98    #server {
 99    #    listen       443;
100    #    server_name  localhost;
101
102    #    ssl                  on;
103    #    ssl_certificate      cert.pem;
104    #    ssl_certificate_key  cert.key;
105
106    #    ssl_session_timeout  5m;
107
108    #    ssl_protocols  SSLv2 SSLv3 TLSv1;
109    #    ssl_ciphers  HIGH:!aNULL:!MD5;
110    #    ssl_prefer_server_ciphers   on;
111
112    #    location / {
113    #        root   html;
114    #        index  index.html index.htm;
115    #    }
116    #}
117
118}
Note that I changed the root and fastcgi_param SCRIPT_FILENAME configuration (video minute 7:00).
To test whether the configuration we created is correct, we can run the following command:
1/usr/local/nginx/sbin/nginx -t
If the syntax and test are successful, then restart Nginx using the init file that we created earlier.
1/etc/init.d/nginx restart
Test accessing the info.php file via the browser at http://localhost/info.php.
From there, we can determine whether Nginx can run and connect to PHP-FastCGI or not.
Security Issue
In terms of computer and software security, we know that no system is perfect and free from bugs.
Nginx “no input file specified” PHP fast-cgi 0day Exploit
After Nginx and PHP CGI are running, try accessing http://localhost/whatever.php
If the browser displays “No input file specified”, our configuration remains vulnerable and is not yet suitable for use.
Exploit : Create anything.gif file using GIMP. In the comment box, fill in the PHP script <?php phpinfo(); ?> and place it in the nginx server root directory (in this article /var/www/nginx/anything.gif).
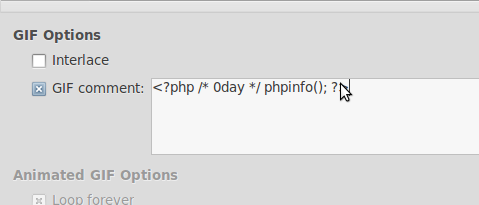
Normally, if we access it from the browser http://localhost/anything.gif it will appear as a normal .gif image. But try accessing the URL from http://localhost/anything.gif/whatever.php then the results are amazing:
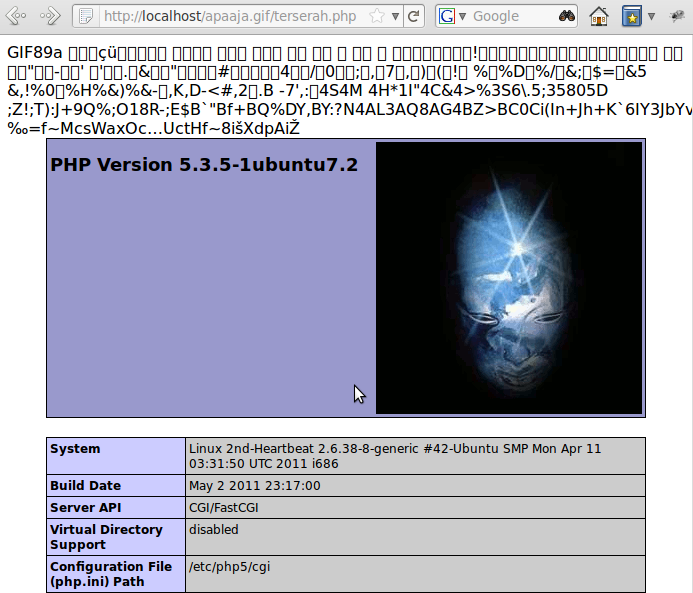
The .gif file is executed as a PHP file (remember the comment on the .gif file <?php phpinfo(); ?>).
Of course http://localhost/anything.gif/whatever.php doesn’t actually exist. But every request that ends with .php will be EXECUTED as a PHP script by Nginx via the cgi.fix_pathinfo feature so that Nginx executes the .gif file as a PHP script!
How to overcome :
- Change
cgi.fix_pathinfo=1tocgi.fix_pathinfo=0inphp.ini - Edit
/usr/local/nginx/conf/nginx.confand add the following sctipt between blockserver { }
1error_page   400 402 403 404  /40x.html;
2   location = /40x.html {
3       root   html;
4}
Modules
Nginx Configure Module Options
During the configuration process, some modules will be enabled by default, and some need to be explicitly enabled.
Enabled by Default
The following modules are enabled by default when the ./configure command is executed. To disable a module, add the commands below:
--without-http_charset_module: Disables module Charset for re-encoding web pages.
--without-http_gzip_module: Disables module Gzip compression.
--without-http_ssi_module: Disables Server Side Include module.
--without-http_userid_module: Disables the User ID module which provides user identification using cookies.
--without-http_access_module: Disables the access restriction module which allows us to configure access for a specific IP range. for example: deny 192.168.1.1/24.
--without-http_auth_basic_module: Disables Basic Authentication module. (like Auth Basic Apache)
--without-http_autoindex_module: Disables Automatic Index module.
--without-http_geo_module: Disables the module that allows us to define variables according to a specific IP range.
--without-http_map_module: This module allows us to classify a value into different values, storing the results in the form of a variable.
--without-http_referer_module: This module allows to block access based on the http referer header.
--without-http_rewrite_module: Disables the Rewrite module.
--without-http_proxy_module: Disables HTTP proxy module for transfer requests to another server (reverse proxy).
--without-http_fastcgi_module: Disables the module for interaction with the FastCGI process.
--without-http_memcached_module: Disables the module for interaction with the memcache daemon.
--without-http_limit_zone_module: This module allows to limit the number of connections for a specific address / directory.
--without-http_limit_req_module: Disables module limit requests which allows us to limit the number of requests per user.
--without-http_empty_gif_module: Returns a 1px x 1px transparent .gif image. (very useful for web designers)
--without-http_browser_module: Disables the module that allows us to read the User Agent string.
--without-http_upstream_ip_hash_module: Disables the IP-hash module for load-balancing to the upstream server.
Disabled by Default
The following modules are disabled by default. To enable these modules, add the commands below:
--with-http_ssl_module: Enables SSL module for websites using the https:// protocol.
--with-http_realip_module: Enables the module to read the actual IP address of a request (usually obtained from the HTTP header trusted proxy).
--with-http_addition_module: Enables module which allows us to add data to website pages.
--with-http_xslt_module: Enables module for XSL to XML transformation. Note: Need to install libxml2 and libxslt library.
--with-http_image_filter_module: Enables the module that allows us to modify images. Note: Need to install libgd library for this module.
--with-http_sub_module: Enables the module to perform replace text in a web page.
--with-http_dav_module: Enables the WebDAV feature
--with-http_flv_module: Enables a special module to handle flash video files (.flv).
--with-http_gzip_static_module: Enables module GZIP static compression.
--with-http_random_index_module: Enables the module to randomly select a file as the index file in a directory.
--with-http_secure_link_module: Enables the module to check URL requests with the required security token. (Also great for anticipating CSRF)
--with-http_stub_status_module: Enables a module that generates server statistics and web server process information.
Miscellaneous options
--with-ipv6: Enable IPv6 support
As we can see, configuring a web server is quite easy. In general, we only need to add an SSL module for serving HTTPS content and “Real IP” to retrieve the visitor’s IP address if we use a proxy or run Nginx as a backend server with another web server.
Example of configuration with all modules:
1./configure --with-http_ssl_module --with-http_realip_module --with-http_addition_module --with-http_xslt_module --with-http_image_filter_module --with-http_sub_module --with-http_dav_module --with-http_flv_module --with-http_gzip_static_module --with-http_random_index_module --with-http_secure_link_module --with-http_stub_status_module
references:


